Showing posts with label Tips And Trik. Show all posts

Careful, Do Until One Create Password !!

Error In the Create a Password for a Personal Account - Password or password is a secret word or phrase used to access something that typically is private and confidential. For example, internet banking password, the password must be known to yourself because if known by others can be misused its use.
Choose a password that is not only confidential but also should that not be easily guessed by others. Most people still use passwords with numbers 123456, password, to qwerty by reason of easy to remember and easy. But you know if the password is easy to guess?
Easily guessed passwords is a serious error because it can create an account becomes insecure and easily broken, so it must be considered correct password to be used for the purposes of the accounts confidential. Some things are often a mistake in creating a password and they often do include the password in the form of numbers that are sorted from 1 to 6 or letter sequence on the keyboard. The actual password is easy to remember but it is very dangerous, and therefore create a password with a unique and not sequential, and if you do not want to forget then record password.
Next create a password with a short word, this is a mistake as well. Due to a short password will be easily broken. Should make a long password with a variety of letters, numbers, and symbols making it very difficult terbobol.
Mistakes are often made again to create a password by replacing letters to numbers, this way is a bit more powerful than the original. But sometimes the password as it is easily broken because the hackers already know this behavior are easy to guess. In addition, never also create a password whose content name or date of birth. It is also still commonly used, namely the use of personal information for a password. A good password should be the password that has nothing to do with ourselves.
That is what needs to be considered in creating a password, especially for accounts that are highly confidential. And the most important is change your password periodically, to make it more secure and not easily broken.

Video and Film Editing in Linux

In the field of video editing and movie, there are many software options that can be used, either paid, open source, and freeware, with the additional effect - a mesmerizing effect. In the Linux operating system (for all distribution / distro), application options for editing video / film, among other Open Movie Editor, Kino, OpenShot, and others.

In this article we will discuss OpenShot. Authors consider, the features provided by OpenShot more complete than similar software on Linux and also easy to use


An overview of OpenShot
OpenShot is an open source software project in the field of multimedia, developed by Jonathan Thomas and the team began in 2008. Open source software is provided for a wide range of distribution (distro) Linux and is now bundled in each repository. You can also download the package and compile it yourself.
As a video editing application / film, OpenShot presents a variety of features. Among others :1.Mendukung extension format wide range of video, audio, and images. However, it suggested to your Linux distribution is already available or install a multimedia codec first. OpenShot can provide this feature with the support of the engine FFMPEG, one of the old players in the world Linux and open source for multimedia.2. You User Desktop Environment (DE) Gnome? If so, know that OpenShot supports drag and drop process and integrates with Gnome. What about the other ED users, eg XFCE, LXDE, KDE, Eblighment, and others in the run OpenShot? No problem in using OpenShot.3.Tersedia various effects and transitions that are ready to use, includes video effects and audio effects. Capture and its detailed discussion will be outlined below.4.Mendukung real time preview. It is very useful to show the direct (preview) video / movie you have given effects, transitions, or editing. With this feature, you can provide an assessment before deciding whether the video / film / audio / image collection you are editing will be exported, saved, or deleted.5.Mendukung multiple tracks. It's also very nice to do multiple edits, whether audio, video, or image collection.

How to hide and restore icon in Chrome extension

Having two or three on the extension icon in your browser's omnibox is not a big deal. It still will not make your browser is too messy and crowded. However, if you have ten or more active extension, then it is a completely different story. You might want to hide the icons to appear in your browser's omnibox while maintaining active extension.

Chrome has a default option that lets you hide or remove the extension icon from the omnibox. You can also restore the icon whenever you want.
How to hide the icon in Chrome extension- On your Chrome web browser, go to your browser's omnibox. It is part of the menu button and the address bar.Next, select the icon you want to hide the extensions. Right-click on the icon and select "Hide button" on the right-click menu.So that's it. The extension button will be hidden from your browser's omnibox. However, you can still access the extension with a keyboard shortcut. Or, you can see extension to the opening page of your browser extension. Simply click the Menu button and then select "More Tools"> "Extensions".How to restore the icon hidden extensions in ChromeNow, if you want to restore the icon back to Omnibar the extension. You just need to open the Chrome extensions page. After that, find the extension with hidden icons that you want to restore. After that, just click the "Show button" right under the extension.Just keep in mind that there are some extensions that rely heavily on their shortcut icons. Without the icon, the extension will not work at all. Therefore, you need to assess each extension first before you decide to hide the icons.
So that's it. You have just learned how to hide and restore icon in the Chrome extension.May be useful.

How to Have a Recycle Bin in the Windows system tray using MiniBin

MiniBin is an application that is sure to facilitate the user's activity. It allows easy access and empty the recycle bin.

compatibility 

MiniBin will work with Windows 7 and in accordance with the developer. This application telahdites in Windows 7 for the purposes of this article.
How do I set up MiniBin
First you need to do is download MiniBin from here. You will receive a zip file containing setup.exe also some themes for the application. You have the option to set MiniBin as portable application also. To do this, you must select the System Integration during the setup process and select the folder where you want to save the program.
features
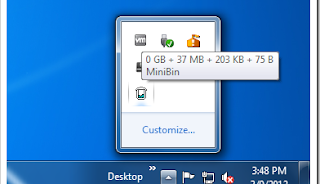
When installing MiniBin, the program icon will appear in the system tray of your computer. This is a useful feature for sebgian of us without MiniBin, typically must access the recycle bin on your desktop.
Another feature of this program is utilized. Simply right click on the icon in the system tray and you will be able to open the recycle bin, clears, or simply configure the functionality of the program.
Configure in the sub-menu, the user can change the following:
- What will dilakakan when taking double-click the program's icon
- How does the program integrate with your system
- The icons displayed in the system tray when the recycle bin is full or empty
By accessing subomenu Icon Double-Click Action, you will be able to empty the recycle bin or open it by double-clicking on the program icon in the system tray.
In subomenu System Integration, you have piihan choose if the program will ask you to confirm the deletion of files in the recycle bin with memilihi "Confirm Recycling". You can also "Allow sound" that will determine if a song is playing or not when the recycle bin is emptied. Finally you can choose whether or not to display a progress window by selecting the Allow Progress Windows.
In sub-meni Change Icons, you have the ability to choose different icons for different levels based on the size of the recycle bin terisis maksimu that you've specified in the recycle bin.
You also have the option to replace the style icon displayed by clicking any icon on the submenu except Only use empty / full. To do this you need to extract the .zip file containing the data with the theme MiniBin.zip initial file into a folder of your choosing.
Conclusion 

MiniBin not the only way to increase the accessibility of the recyle bin but it is a feasible option. By offering such fiturofitur enough mengdouble click to remove the waste basket Part of it certainly can save you time.

Cara Setting DNS di Windows 7 dan XP

DNS (Domain Name System) adalah sebuah sistem yang menyimpan informasi tentang nama host maupun nama domain dalam bentuk basis data tersebar (distributed database) di dalam jaringan komputer.
Fungsi DNS di Internet adalah untuk mengerjakan pengalamatan dan penjaluran (routing), sehingga saat kita mengetikkan misal : www.google.com maka DNS server akan mencarikan alamat IP address dari host yang bersangkutan.
Alamat DNS yang disediakan oleh provider ISP seringkali kinerjanya lebih lambat bila dibandingkan DNS server milik Google dan OpenDNS (Definisi lambat disini adalah saat pencarian (lookup) alamat website di internet). Maka untuk mengatasi masalah diatas kita perlu mengganti setting default DNS Server ISP dengan alamat DNS Server lain seperti Google Public DNS ataupun OpenDNS.
Merubah DNS juga bisa dilakukan bagi orangtua yang ingin membatasi internet dirumahnya supaya anak tidak bisa mengakses situs porno dengan mengganti Setting DNS-nya dengan DNS Nawala.

Cara merubah setting DNS server di Windows 7 dan Windows XP

Setting DNS di Windows 7

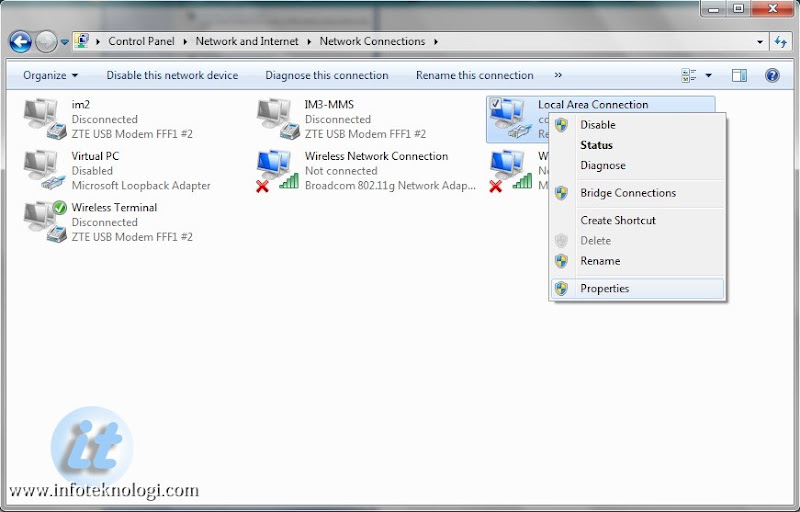
  • Masuk ke Control Panel | Network and Internet | Network Connections
Gambar Control Panel di Windows 7
  • Akan muncul daftar network adapter yang terinstall di komputer anda.
    Pengguna internet di rumah dan kantor biasanya harus merubah setting Local Area Connection sedangkan pengguna Laptop/Notebook/Modem 3G akan menggunakan Wireless Network Connection.
  • Klik kanan Local Area Connection atau Wireless Network Connection dan pilih Properties.
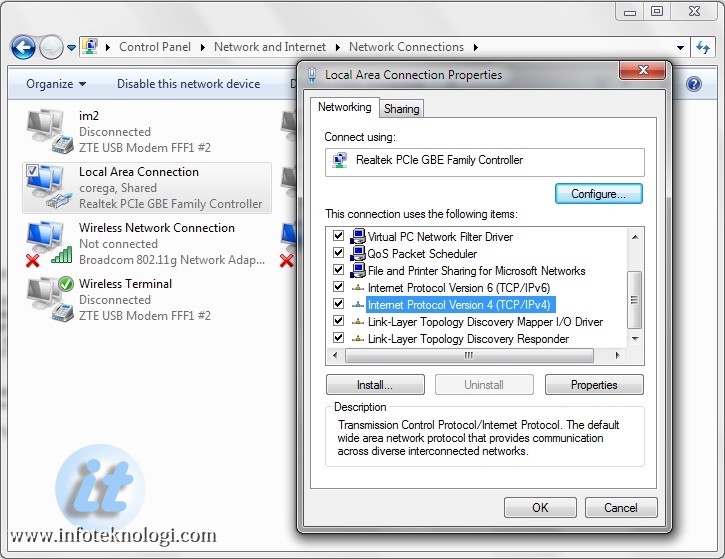
Setting DNS Server di Windows 7
  • Pilih Internet Protocol Version 4 (TCP/IPv4) dan klik tombol properties
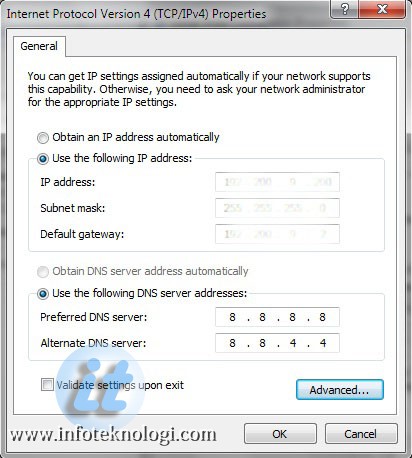
Internet Protocol Version 4 (TCP/IPv4) Properties
  • Isi kotak isian “Use the following DNS server Addresses”:
    (Infoteknologi.com mengisinya dengan DNS dari Google, untuk DNS lain lihat di bagian akhir artikel)
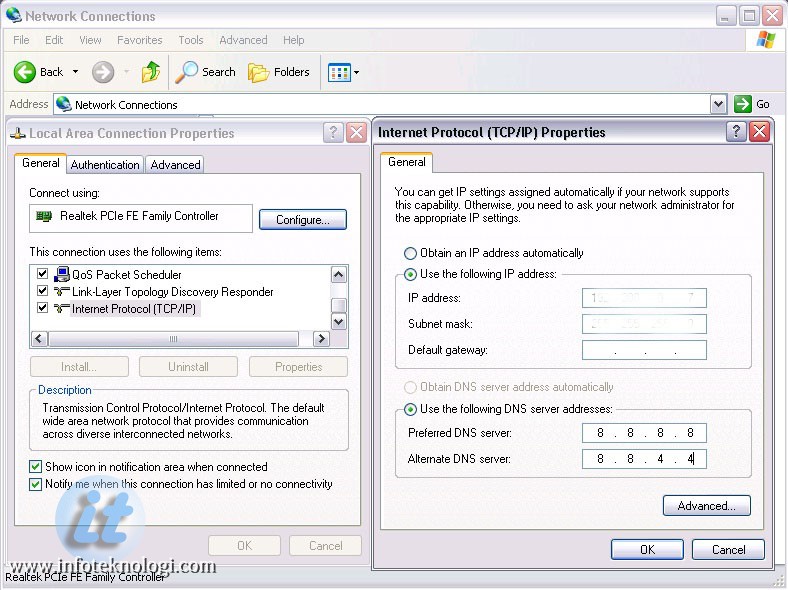
Preferred DNS server: 8.8.8.8
Alternate DNS server: 8.8.4.4
  • Tekan Tombol OK untuk menyimpan pengaturan DNS.

Untuk merubah Setting DNS Server di Windows XP

  • Masuk ke  Control Panel | Network Connections
  • Klik kanan Adapter (Local Area Connection atau Wireless Network) lalu pilih Properties
Setting DNS di Windows XP
  • Pilih Internet Protocol (TCP/IP) klik tombol Properties, lalu pada “Use the following DNS server Addresses” isikan Preferred dan Alternate DNS server dengan DNS Server Google atau OpenDNS.
  • Simpan setting DNS dengan menekan tombol OK

Ada bermacam-macam DNS Server yang umum digunakan dan terbukti kecepatan dan keamanannya, berikut daftarnya:

DNS Google (Google Public DNS) : OpenDNS DNS Nawala Norton DNS
8.8.8.8 208.67.222.222 180.131.144.144 198.153.192.10
8.8.4.4 208.67.220.220 180.131.145.145 198.153.194.10

208.67.222.220


208.67.220.222

Cara mengganti pita printer dot matrix yg biasa dipakai di kantor dan kasir

Meskipun teknologi cetak dokumen saat ini sudah sangat maju dengan kehadiran printer laser, deskjet, inkjet dan 3D printing namun Printer Dot Matrix masih menjadi pilihan bagi banyak orang terutama di perkantoran, kasir, mini market, dll.

Hal ini terjadi karena fungsi printer dot matrix yang tidak bisa digantikan, yaitu kemampuan print di kertas continous paper, membuat carbon copy, dan juga harga pita refill yang tergolong lebih murah.
Namun tidak seperti mengganti tinta printer bertipe laser ataupun inkjet yang cukup membuka printer dan langsung memasangnya dengan yang baru; maka penggantian pita printer dot matrix lebih sulit dan menantang apalagi untuk orang yang belum pernah melakukannya.
Oleh karena itu pada kesempatan kali ini Info Teknologi akan berbagi cara mengganti pita printer dotmatrix  Epson LQ-2170, LQ-2180, LQ-2190, LQ-1170, LQ-1180, LX-300, LX-800, DFX-5000, DFX-8000, dll. (Note: Klik tiap gambar untuk melihat ukuran gambar yang lebih besar)

Cara mengganti pita printer dot matrix
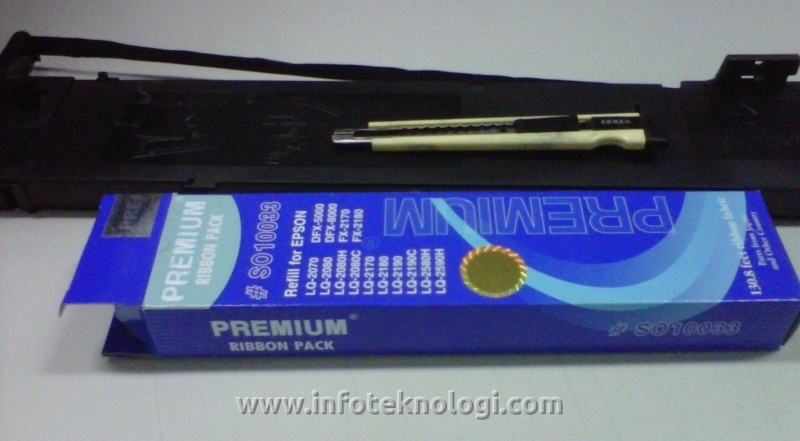
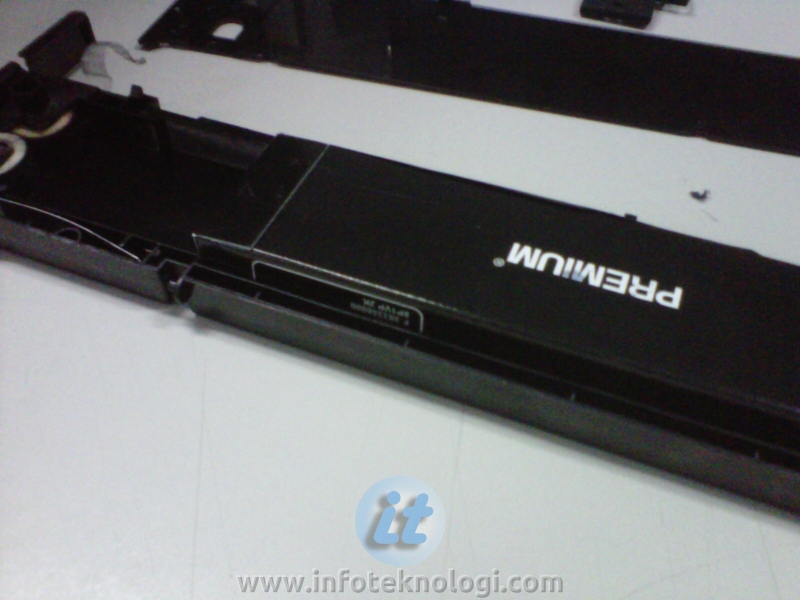
1. Siapkan semua perlengkapan yang dibutuhkan yaitu cutter / silet, isolasi, dan tentu saja pita printer refill (dalam tutorial ini penulis menggunakan pita printer Premium Ribbon Pack yg mudah didapatkan dimanapun)
cara ganti pita printer epson
2. Buka semua pengait yang mengunci kotak cartridge (tempat pita) sampai cartridge terbagi menjadi 2 bagian.
cara membuka cartridge printertinta printer dot matrix
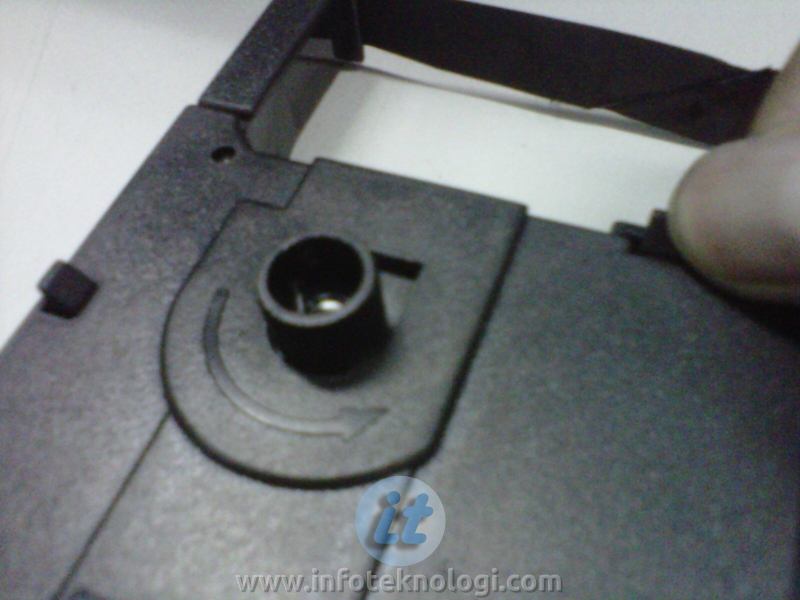
3. Tekan roller cartridge disebelah kiri kebawah (gambar 1), kemudian lepaskan pita printer lama dan bersihkan cartridge printer dari kotoran yang masih tertinggal.
remove ribbon from cartridgegambar printer ribbon
4. Masukkan kotak pita kedalam catridge sesuai posisi yang ada pada gambar dibawah.
Premium Ribbon Pack refill for Epsonchange dot matrix ribbon cartridge
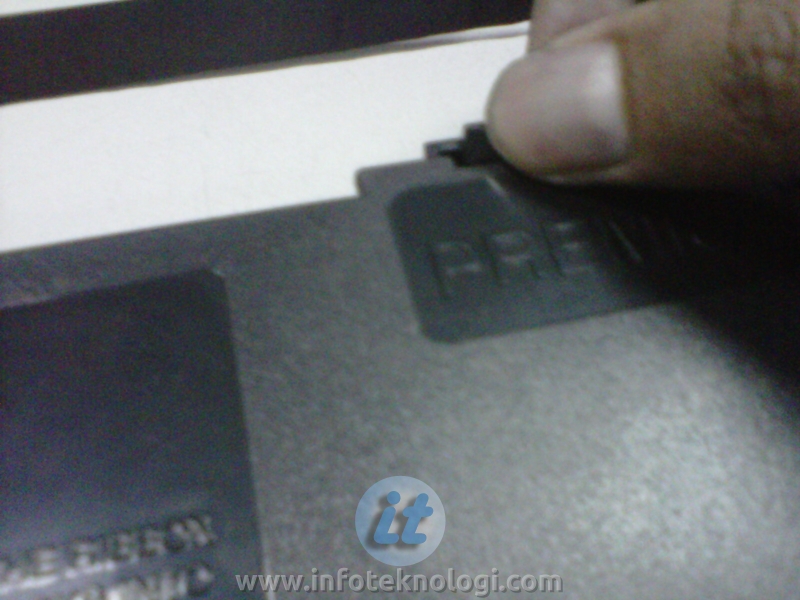
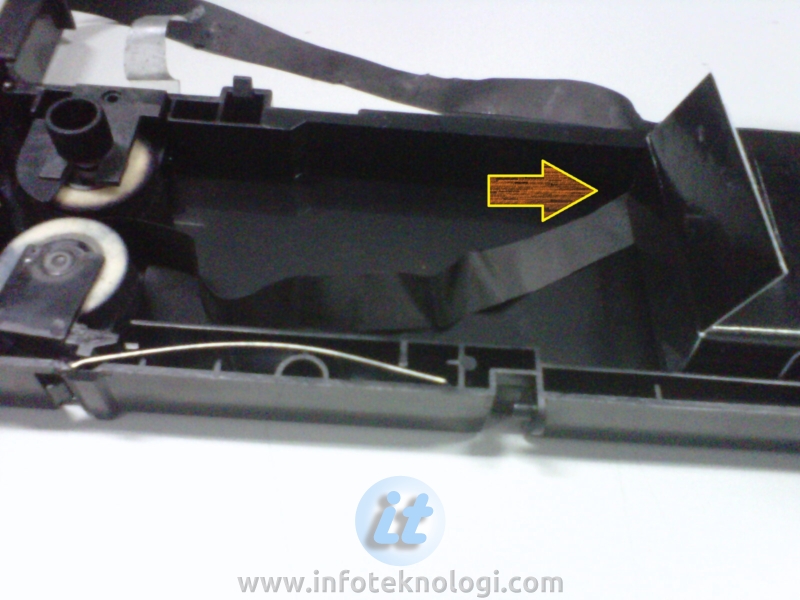
5. Masukkan pita ke roller cartridge disebelah kiri mengikuti alurnya (gambar 1), lalu lepaskan kait dibagian bawah supaya roller menekan kembali. Dan dibagian kardusnya, selipkan pita kebagian bawah kardus (gambar 2).
gambar bagian dalam cartridge printerLipat pita ke bawah kotak refill
6. Setelah selesai kita beralih ke sisi sebelah kanan, dimana anda memasukkan pita sesuai alur yang ada (gambar 1). Lalu sobek bagian karton yang menganga keluar di sisi kanan (gambar 2).
masukkan sesuai alur yang adaTutorial penggantian pita printer epson
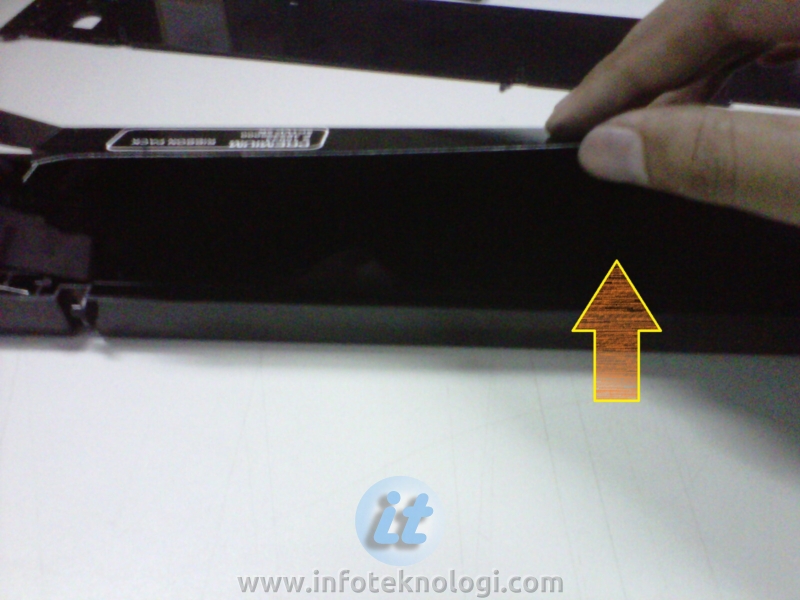
7. Bila kedua sisi pita telah terpasang di cartridge, maka alihkan perhatian anda ke bagian kiri kardus dan tarik perlahan-lahan karton keluar.
tarik kardus penahan ribbon
8. Tarik karton secara hati-hati mulai dari bagian bawah. Jangan terlalu cepat karena terkadang pita menempel dikardus sehingga bisa membuat pita dalam catridge berantakan.
cabat kardus secara perlahan-lahancara ganti pita printer kasir
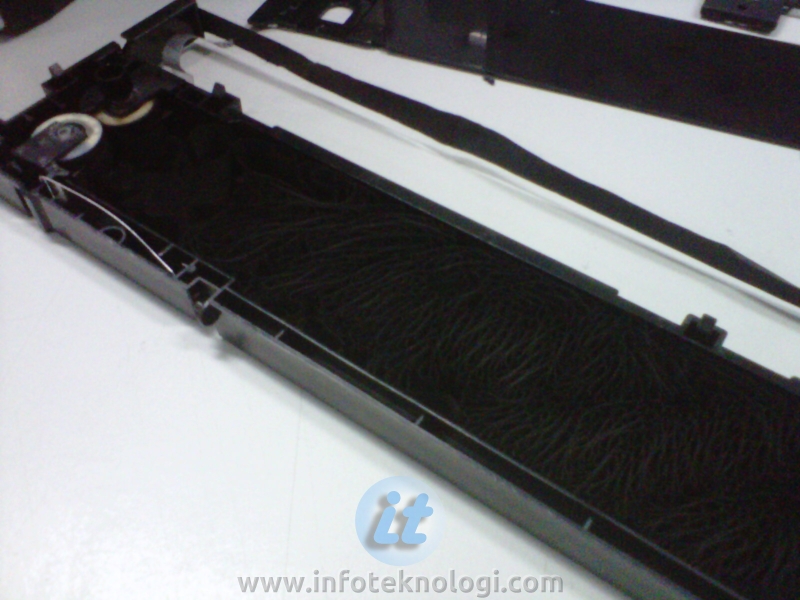
9. Setelah kardus ditarik biasanya ada beberapa bagian pita yg keluar dan berantakan, jadi sebelum ditutup anda harus merapikannya terlebih dahulu.
dot matrix cartridge Epsonisi tinta printer kasir, continuous form, carbon copy
10. Bila sudah rapi, maka satukan lagi 2 bagian catridge dan pasang pengaitnya dengan mantab. Dan untuk menghindari catridge terbuka saat printer bekerja sebaiknya kita jangan lupa memasang isolasi di bagian kiri dan kanan.
foto printer catridgedot matrix LQ-2180, LQ- 2170, LX-300, LX-800rekatkan isolasi agar tidak lepas
11. Pasang plastik pengaman pita head printer. Dan proses penggantian pita printer telah selesai :)
plastic ribbon coverplastik penahan pita di head printercover plastik penahan di head printer

Tips mengganti pita printer dot matrix:

– Lakukan secara perlahan dan jangan terburu-buru.
– Terkadang pita printer yg disimpan terlalu lama akan lengket pada kardusnya, jadi pukul / tekan kardus secara perlahan dari bagian luar.
– Tutorial diatas menggunakan contoh cartridge printer LQ-2180, tapi anda tetap bisa menerapkannya untuk tipe maupun merek lain karena pada dasarnya caranya sama saja.